
Basics of audio editing in Audiate
Proper audio editing is key to making your video or podcast a success. Read how to cut an audio file and what basic audio recording editing is needed to achieve good sound quality. You don’t have to be a sound engineer or audio professional to do this – with the right software, even amateurs can achieve professional results.
Contents
The right audio editing software
cut audio
Edit pauses and ums in the audio
Remove unwanted background noise in audio
Check and export audio
FAQs Edit and cut audio
The right audio editing software
To cut and edit audio, you need an appropriate tool. There is a wide range of audio editing software on the market, but not every tool is equally suitable for all purposes. If your focus is on training videos, tutorials or slide shows, then you need audio software that scores particularly well with voice recordings. One of them is TechSmith’s Audiate, a simple and powerful tool for text-based audio editing.
Here we present the central functions and advantages of Audiate:
- Audiate transcribes your voice recording, making it easier for you to cut the audio file. Classic audio software is mostly limited to processing the waveform (waveform) of the acoustic recording. Often this means spending hours zooming in and out of the acoustic waveform to find errors. With Audiate, you can quickly and precisely identify errors in the displayed text and edit and delete slips of the tongue, long pauses and umms directly in the text.
- Audiate allows you to remove too long pauses or ums with one click and makes audio editing and cutting of voice recordings efficient and precise.
- With the effects in Audiate you can create audio recordings in studio quality: remove unwanted room noise, improve the sound of your voice and solve common sound problems with just a few clicks.
cut audio
- To cut your audio file, open Audiate and first check the language settings under Settings > Language > German (or select another language).
- Import your audio recording via File > Import Audio. Audiate allows importing files in .wav, .mp3, .m4a and .mp4 format.
- Audiate will now automatically transcribe your voice recording. The transcribed text is displayed in the editing window.
- For further editing, you can show the waveform of the recording (Waveform Editor) in addition to the text. You have two options: either click on a word and then on the wave symbol below it:
Or click on the wave icon in the editing window at the bottom left to show and hide the Waveform Editor:
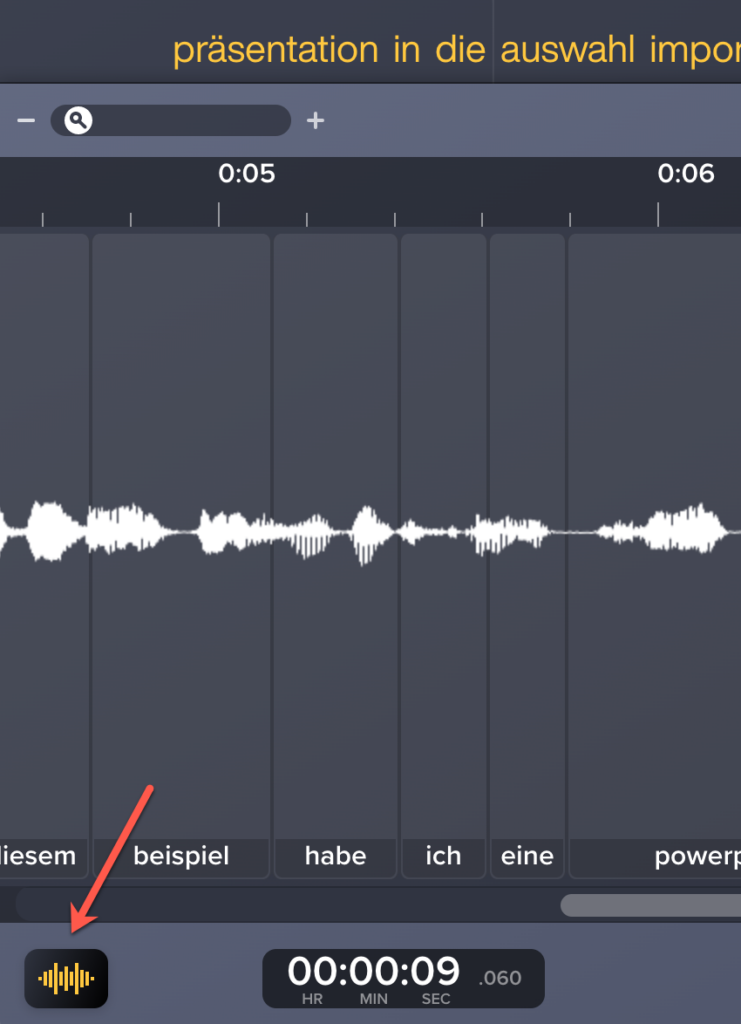
- Now you can trim your audio. Remove the beginning or end of the recording, words or entire sentences, either by selecting and deleting the section in the transcribed text, in the text display below the waveform, or in the waveform itself:
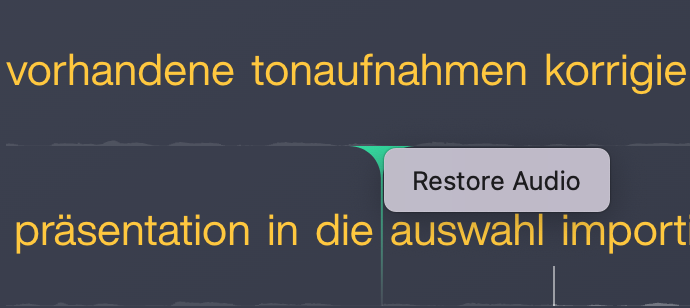
- Accidentally cut out a section that you still need? No problem. As soon as you cut your audio, Audiate places a marker at the appropriate point. To undo the operation, click on the marker and select Restore Audio:
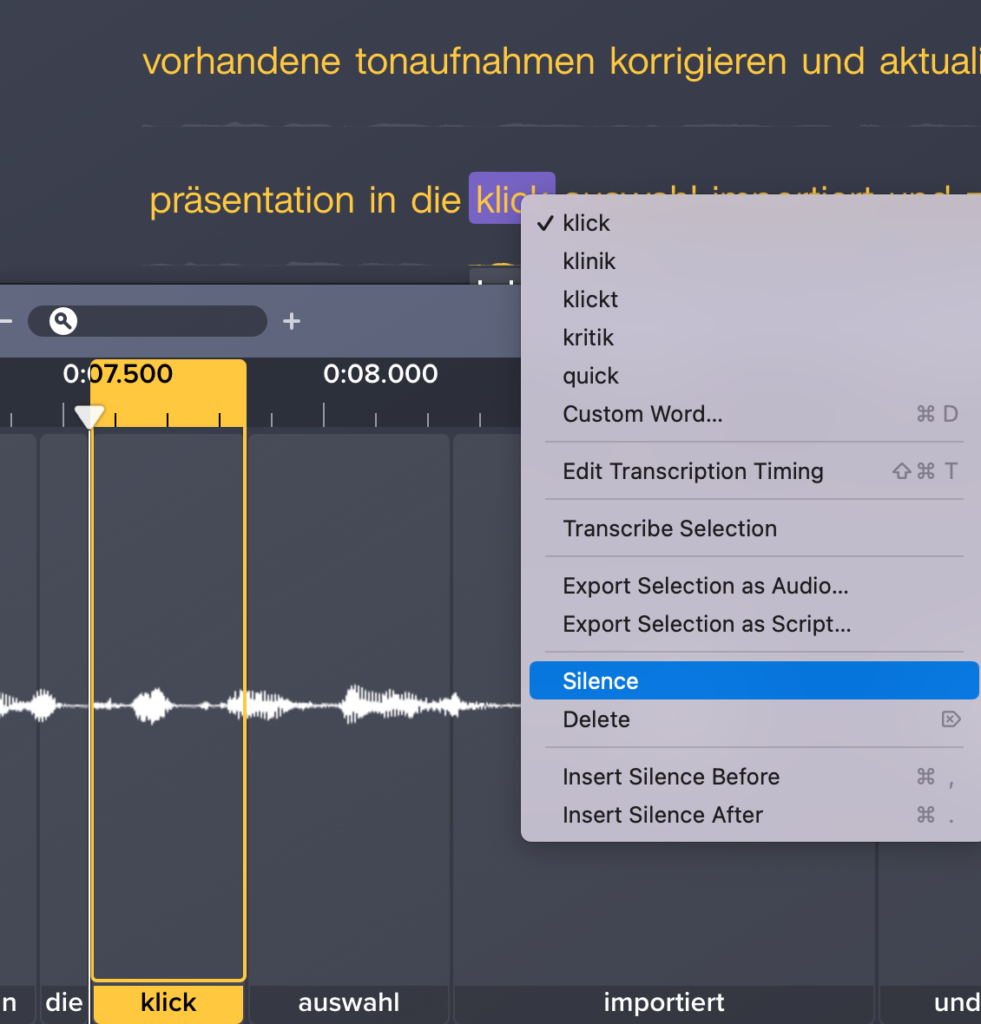
- You can also mute sections to avoid accidental deletion or to export different versions of a recording. To do this, select the word or phrase and click on Silence in the context menu. Silent sections appear white in Audiate’s text display:
All-rounder for audio: cut, edit, transcribe
Get your free Audiate trial today! Cut your audio files, transcribe voice recordings and create professional sound files with just a few clicks.
Download Free Trial
Edit pauses and ums in the audio
A common problem with voice recordings are long pauses and unconscious ums, ahhs or similar filler sounds. With Audiate you can remove these errors precisely and efficiently. In the transcribed text, Audiate displays ums with three periods and pauses with a hyphen:

You can now either click and remove the ums individually or remove all ums with one click. To do this, go to the menu Edit > Delete All Hesitations:
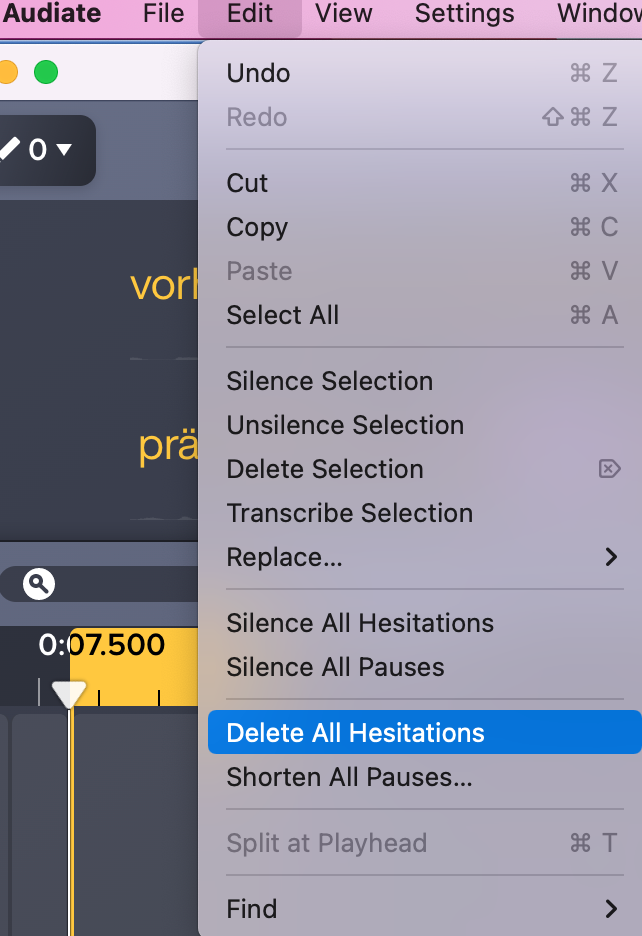
Instead of deleting the ahms, you can also mute them using the function Edit > Silence All Hesitations.
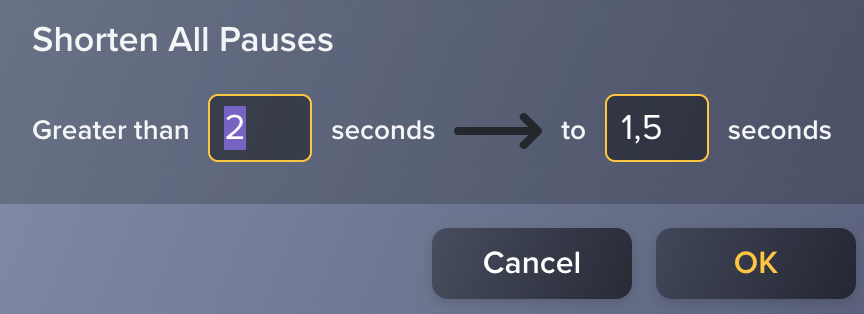
Use the function to remove pauses that are too long Edit > Shorten All Pauses. In the dialog window you can enter all pauses, e.g. e.g. last longer than 2 seconds, shorten it to e.g. 1.5 seconds:
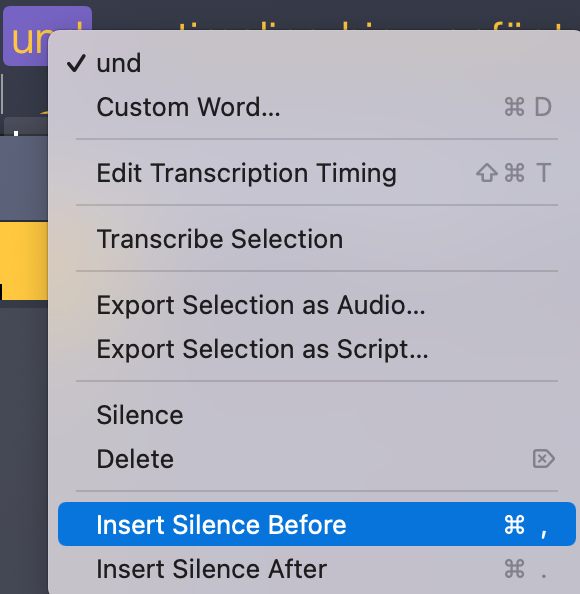
However, pauses are important for a natural flow of speech and should not be too short. Audiate helps you insert natural-sounding rests. To do this, click on a word, right-click and select Insert Silence Before or Insert Silence After. Audiate then inserts a half-second pause before or after the word:
To insert long pauses individually, go to the Waveform Editor. Highlight a word and drag it to the right to add a longer pause beforehand:
Remove unwanted background noise in audio
Avoid time-consuming audio editing by following these 10 points for good sound recordings before recording the audio. However, if you have unwanted background noises in your recording, such as street noise or air conditioning vents, you should remove them before you apply other effects to your audio file. For this, Audiate provides you with the effect Remove Noise a simple and effective function for cleaner and purer voice recordings without annoying noise.
First, bring up Effects in Audiate by clicking on the Properties icon in the bottom right corner.
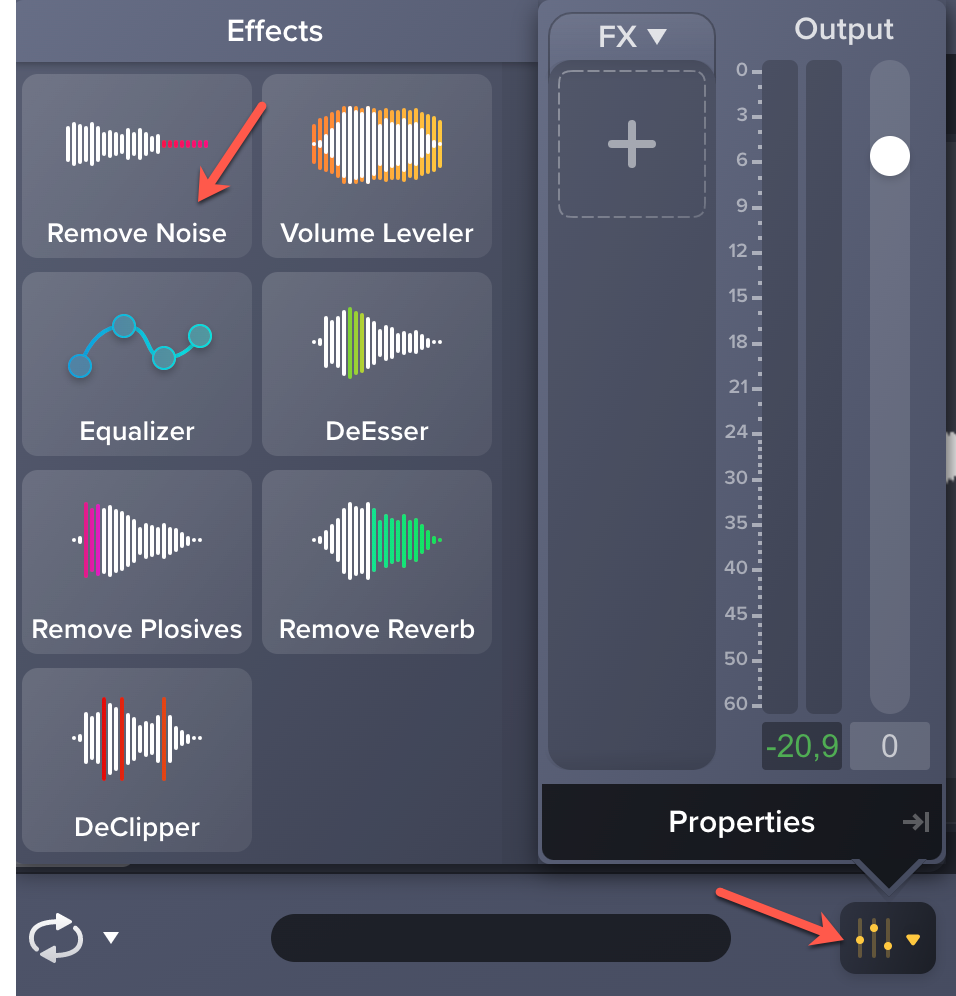
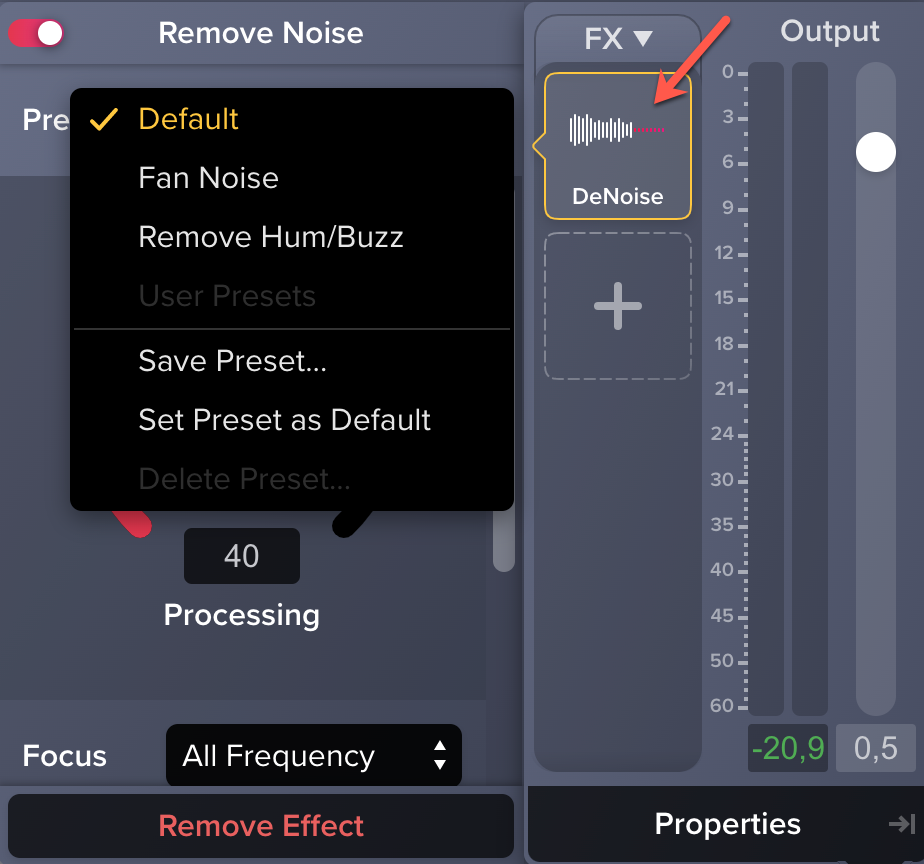
Click on the effect Remove Noise. This will now be automatically added to your properties list and applied to your audio recording. Either opt for automatic noise reduction (default) or use the presets for Fan Noise (ventilation) or Remove Hum/Buzz (Brums).
Also, get acquainted with Audiate’s other effects to improve the quality of your audio recording, like Volume Levelerto equalize the volume, or De-esserto improve the pronunciation of hard consonants like “eszett” or “ess”.
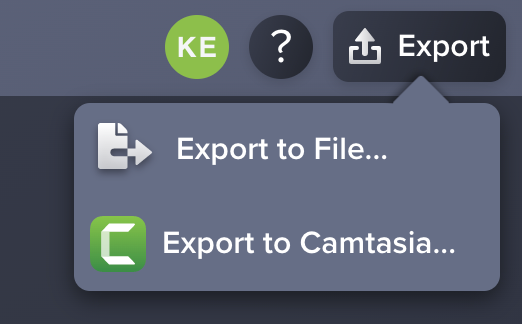
Check and export audio
Check your edited audio in between and play it with the play button. Even if you are not a sound professional, you should use headphones. Finally, export your file by clicking at the top right of the editing window Export click. Save the file locally via Export to File:
You can choose between .wav, .mp3 and .m4a as file formats. (Learn more about audio formats.)

If you want to add the audio file to a video you are editing in Camtasia, you can do that directly from Audiate using the feature Export to Camtasia again.
Audiate also offers you the option of exporting a transcribed voice recording as a text file or for subtitling, for example to subtitle a voice-over. To do this, go to the menu File > Export Script and choose format .txt for text file or .srt for subtitle. (Learn more about transcription in Audiate.)
Text-based audio editing with Audiate
Convert your voice recordings to text. Delete unwanted words, shorten or add pauses, easily correct slips of the tongue in the text and export your recordings as audio or text files.
Download Free Trial
FAQs Edit and cut audio
What does audio editing involve?
Audio editing includes changing and cutting audio and adding effects. Audio editing is also referred to as audio editing. Audio editing software is required for audio editing.
What are the steps in audio editing?
As a rule, the first step in audio processing is to eliminate problems. For example, pauses that are too long or incorrect sections are cut out or annoying background noise is removed. In the second step, the quality is improved using added effects. In professional music editing, audio editing is followed by mixing and mastering.
What do destructive and non-destructive audio editing mean?
If the audio processing takes place in the original file and is written to the file, this is called destructive audio processing. Changes in the original file can usually not be undone and should be carefully considered.
With non-destructive audio editing, the audio program “remembers” the changes, but does not write them into the original file. The changes are only saved in the new file when the file is exported. Most audio programs today work non-destructively.
What is the purpose of fade-in and fade-out in audio editing?
If an audio recording fades in softly and gradually gets louder, this is referred to as a fade-in. If the audio gradually becomes quieter at the end, this is referred to as a fade-out.
If an audio recording does not start at the zero point of the waveform, you will usually hear a slight cracking sound. This can be avoided with a fade-in. Fade-in and fade-out also prevent annoying crackling at the transitions when merging two audio recordings, as they ensure zero points. Many audio programs offer functions such as “Automatic Fade” or “Auto Fade” for automatic fading in or out.