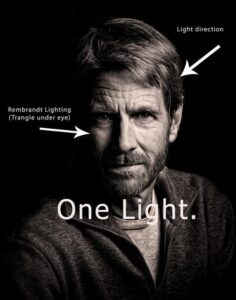
Rembrandt lighting is a type of lighting that is used in photography and cinematography to create a dramatic and intense image. This type of lighting was developed and made famous by the Dutch painter Rembrandt Van Rijn, who used it to create intensely emotional looking paintings.
Rembrandt lighting consists of a single main light source, usually placed at about a 45-degree angle to the subject. The main light source is directed towards the subject, creating a triangular shadow under the jaw and a second shadow on the opposite cheek. This creates a triangular area of light and shadow on the face, which gives depth and drama to the image.
The side of the face illuminated by the main light source should be the most interesting or expressive side, as this illumination brings out the distinctive features of the face. Also, the light source should be placed close enough to the subject to create an area of bright light and a sharp shadow.
In general, Rembrandt lighting is a very versatile technique and can be used in many different situations, such as for portraits, fashion photography and still life photography.
However, it is important to note that this type of lighting is not suitable for all subjects and can make some images too intense or dramatic.
In summaryRembrandt lighting consists of a single main light source that is placed at an angle of about 45 degrees to the subject, creating a triangular area of light and shadow on the face that gives depth and drama to the image.
This technique is very versatile and can be used in many different situations, but it is not suitable for all subjects.
- Choose a light source: you need to have a main light source, such as a flash, studio light, or natural window. The light source should be positioned at about a 45 degree angle to the subject.
- Adjust the power of the light: the main light source should be bright enough to create a sharp, dramatic shadow on the subject’s face. You can adjust the power of the light using a diffuser or grid to direct the light more precisely.
- Place the subject: the subject should be positioned so that the light falls on the side of the face that you want to highlight. If the subject looks towards the light source, the triangular area of light and shadow on the face will be more evident.
- Adjust the position of the light source: the position of the light source should be adjusted to obtain the desired triangular area of light and shade. If the light is too high or too low, the dramatic effect may not be achieved.
- Adjust exposure: you need to adjust the exposure to get a well exposed photo. If the light source is too bright, you may need to use exposure compensation to avoid an overexposed image.
- Choose the target: the lens used will affect the depth of field of the photo. If you want more depth of field, you can use a lens with a smaller aperture.
In summaryTo take photos with Rembrandt lighting, you need to choose a light source, adjust the power of the light, position the subject, adjust the position of the light source, adjust the exposure, and choose the right lens. These steps will help you create a dramatic and intense photo with Rembrandt lighting.
We are waiting for you on our page Facebook !!!
