
How to record a video
Live streams are everywhere: whether on YouTube, social media channels such as Instagram, Facebook or TikTok or with very traditional news and media providers. But live video is short-lived and inaccessible once it is broadcast. Unless you record the live stream. This works both on YouTube and on any other video platform with the right screen recorder. How to record a live stream as a video is explained step by step in this article. How to record your live stream for long-term storage or making it available.
Step 1 Find a desktop recording software
There are now a lot of tools for recording and recording streaming videos, so-called screen recorders. However, you should be careful with free tools: Many providers use them to collect your personal information in order to then spam you.
If you are still looking for a suitable tool, it is worth doing a test first. TechSmith Snagit and Camtasia screen recorders are available as free full trial versions. Snagit lets you capture simple images, audio, and video. Camtasia is also suitable for recording entire TV shows or films and then editing them in the video editor: With Camtasia, for example, you can easily combine several videos, add subtitles or background music and export the video in various formats.
Record and produce videos with Camtasia
Record videos and live streams and edit the video recordings. Camtasia offers an easy-to-use screen recorder and professional video editing features.
Download Free Trial
Step 2: Open Recorder and select recording area
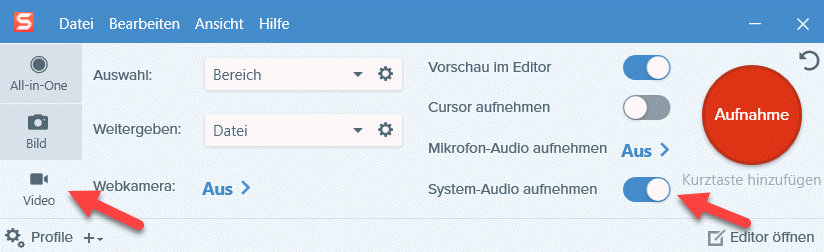
Open either Camtasia Recorder or the Snagit Capture window. First enable the recording of the system audio. This is very important when recording live streams, otherwise you can see the video recording but the audio is missing. You can also specify a recording area: You can record the entire screen as a video or just a selected section of the screen:
Video Capture Settings in Snagit
In Snagit, under the Video tab, enable Record System Audio. Under “Selection” you can select “Area” or “Full screen”. Then click the red “Record” button. A crosshair opens to select the screen area.
Video Recording: Settings in Camtasia
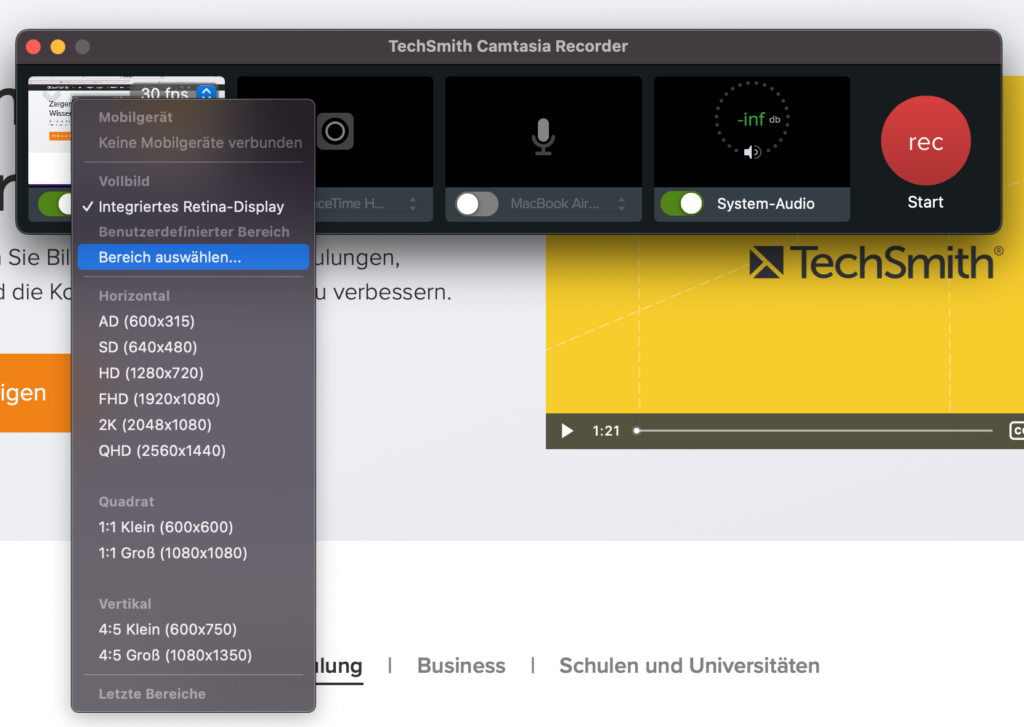
In Camtasia Recorder, you must also enable “System Audio” in order for your recorded live stream to include an audio track. Then select the screen area or format you want to record. Camtasia offers many standard video capture formats, including vertical formats such as 1080 x 1350 px, which is good for uploading videos to Instagram.
Step 3: Start recording and record live stream
In the Camtasia and Snagit capture menu, the capture button is clearly visible. Before the recording starts, there is a short countdown in both programs. Stop or pause recording using either the menu or hotkeys.
Tip for professionals: shortcut keys
Hotkeys allow you to quickly pause and resume video recording. This works in Camtasia (F9 / F10) and in Snagit (Shift+F9 / Shift+F10). If you use Snagit to capture videos frequently, it’s even worth creating your own profile and assigning custom keyboard shortcuts for capturing video.
Step 4: Save, produce and upload the video recording
Snagit instantly renders your video capture as an MP4 file and opens the file in Snagit Editor. From there, you can either save your video capture directly to your computer or another destination, and even upload it directly to Screencast.com or YouTube. You can convert a short excerpt or a single scene from the video recording into a GIF file.
Camtasia also opens your recording directly in Camtasia Editor. There you can edit the video as you like, for example add more clips or subtitles, trim the video or add audio effects. When you’re done editing, you can produce your video in a variety of formats, save it to your computer, or share it directly to web destinations. Complete tutorials on how to use Camtasia and Snagit are available here: https://www.techsmith.de/tutorial.html
Record and produce videos with Camtasia
Record videos and live streams and edit the video recordings. Camtasia offers an easy-to-use screen recorder and professional video editing features.
Download Free Trial
Notice on copyright protection when recording live streams
In principle, live streams are protected by copyright just like pictures, films and music on the Internet. This means that unauthorized recording and the use and distribution of these recordings are only possible if you have obtained the consent of the rights holder. If it is your own live stream, recording and further use is usually unproblematic. However, you must also obtain the permission of everyone appearing in the recording.